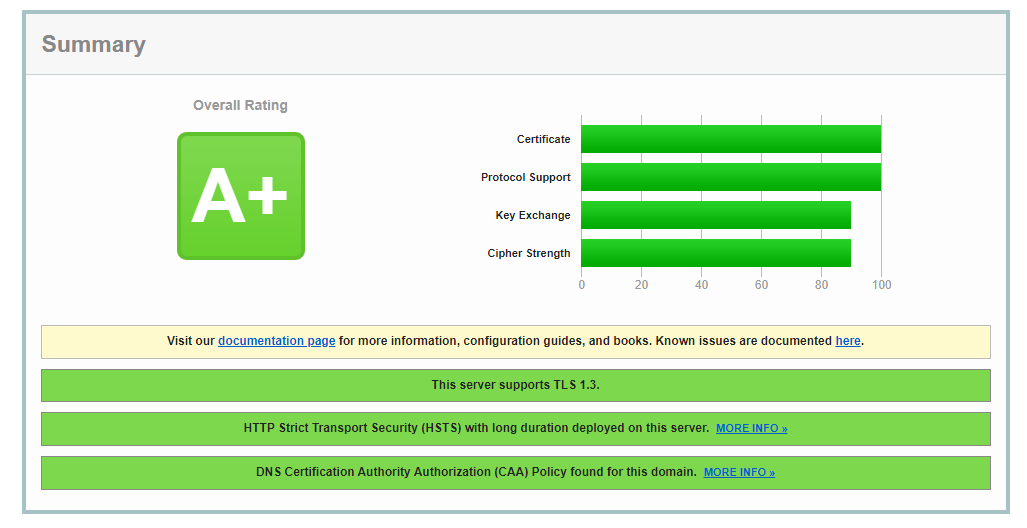
Harden NetScalers and get an A+
Want an easy way to get your https NetScaler sites to match a blood type, or the grades I tell my kids I got in school? These steps should get you where you need to go. These will harden the http and ssl default profiles, or you could modify this in your environment to create dedicated HTTP and SSL Profiles for your sites. My preferred method is to super lock down the default, and then create less secure profiles for any sites that need other security levels.
Putty, or your personal preferred ssh software into your NetScalers to copy and paste these code snippets into the console.
HTTP Profile Hardening
New NetScaler firmware will call-out if you don't have the proper HTTP profile settings for security. Running the following command will add the necessary HTTP Profile changes to address these vulnerabilities. If after applying it you have older HTTP sites having issues, just duplicate the default and de-select Drop Invalid HTTP requests, Mark HTTP/0.9 requests as invalid, and Drop extra CRLF.

set ns httpProfile nshttp_default_profile -dropInvalReqs ENABLED -markHttp09Inval ENABLED -reqTimeout 30
SSL Profile Hardening
First, enable the default profile function. This command should always be run by itself, because it asks you to confirm the setting. The rest of the code can be sent in batches as they don't prompt after entry. Make sure to hit Enter after pasting in blocks, otherwise the last line may just sit there waiting to be entered.
Next create a secure Diffie Hellman key. This process will take some time to generate. So don't be alarmed if it sits for a few minutes.
Now we will create a custom Cipher Group holding only our preferred ciphers
add ssl cipher Secure_Cipher
bind ssl cipher Secure_Cipher -cipherName TLS1.3-AES256-GCM-SHA384 -cipherPriority 1
bind ssl cipher Secure_Cipher -cipherName TLS1.3-CHACHA20-POLY1305-SHA256 -cipherPriority 2
bind ssl cipher Secure_Cipher -cipherName TLS1.3-AES128-GCM-SHA256 -cipherPriority 3
bind ssl cipher Secure_Cipher -cipherName TLS1.2-ECDHE-ECDSA-AES128-GCM-SHA256 -cipherPriority 4
bind ssl cipher Secure_Cipher -cipherName TLS1.2-ECDHE-ECDSA-AES256-GCM-SHA384 -cipherPriority 5
bind ssl cipher Secure_Cipher -cipherName TLS1.2-ECDHE-RSA-AES256-GCM-SHA384 -cipherPriority 6
Next we will utilize the best ECC Curves for the updated profiles. I added the X_25519_MLKEM768. If your firmware doesn't support it, you may see an error, but the rest will bind fine.
unbind ssl profile ns_default_ssl_profile_frontend -eccCurveName ALL
bind ssl profile ns_default_ssl_profile_frontend -eccCurveName X_25519_MLKEM768
bind ssl profile ns_default_ssl_profile_frontend -eccCurveName X_25519
bind ssl profile ns_default_ssl_profile_frontend -eccCurveName P_256
bind ssl profile ns_default_ssl_profile_frontend -eccCurveName P_384
bind ssl profile ns_default_ssl_profile_frontend -eccCurveName P_521
Finally we will set our secure settings on the default profile, and remove the default settings
set ssl profile ns_default_ssl_profile_frontend -tls1 DISABLED -tls11 DISABLED -tls12 ENABLED -tls13 ENABLED -denySSLReneg NONSECURE -HSTS ENABLED -maxage 4294967294 -dh ENABLED -dhFile "/nsconfig/ssl/SecureDH" -ocspstapling ENABLED

bind ssl profile ns_default_ssl_profile_frontend -cipherName Secure_Cipher -cipherPriority 1

unbind ssl profile ns_default_ssl_profile_frontend -cipherName DEFAULT
But what if you don't want to modify the default profile? Well you can use this same code to create a custom profile, then you can bind this profile to sites instead of the default. So if my profile was named My_Super_Secure_Profile my code would look like the following.
add ssl profile My_Super_Secure_Profile -tls1 DISABLED -tls11 DISABLED -tls12 ENABLED -tls13 ENABLED -denySSLReneg NONSECURE -HSTS ENABLED -maxage 4294967294 -dh ENABLED -dhFile "/nsconfig/ssl/SecureDH" -ocspstapling ENABLED

bind ssl profile My_Super_Secure_Profile -cipherName Secure_Cipher -cipherPriority 1

unbind ssl profile My_Super_Secure_Profile -cipherName DEFAULT

unbind ssl profile My_Super_Secure_Profile -eccCurveName ALL
bind ssl profile My_Super_Secure_Profile -eccCurveName X_25519
bind ssl profile My_Super_Secure_Profile -eccCurveName X_25519_MLKEM768
bind ssl profile My_Super_Secure_Profile -eccCurveName P_256
bind ssl profile My_Super_Secure_Profile -eccCurveName P_384
bind ssl profile My_Super_Secure_Profile -eccCurveName P_521
Now the other feature you will want to enable is DNS CAA security. This involves creating a DNS txt record in your DNS with the FQDN of the Certificate Authority. So for my let's encrypt certs I have my Go Daddy settings as below.
